Introduction
In this blog, we are going to understand why developers use RoomDB for android applications instead of using the SQLite. The main problem many developers face during implementation of SQLite is that the database and the tables have to be created manually which will result in compile time errors
For Example:
String CREATE_EMPLOYEE_TABLE = “CREATE TABLE ” + TABLE_NAME + “(“
  + KEY_ID + “INTEGER PRIMARY KEY,” + KEY_NAME +
  “TEXT,” + KEY_PASSWORD + “TEXT,” + KEY_BALANCE + “INTEGER,”
  + KEY_AGE + “INTEGER” + “)”;
During creation of the table the main focus must lie on the expression failing which may lead to compile time errors. To overcome this, Google introduced Room architecture .
Basically, Room DB helps to create sqlite databases and perform the operations like create, read, update and delete. Room makes everything very easy and also decreases the boilerplate code.
Proven Reasons why use Room ?
For any schema change, the RoomDB automatically updates the query thus making the querying simpler. Also, RoomDB enhances the querying time and results are returned faster when the query is executed on the selected fields. The DAO inheritance feature makes it more popular. Last but not the least the desired output is higher with lesser code usage. It can also be easily integrated with other architecture components
Benefits of ROOM vs SQLite
- In SQLite, The compile time verification of raw queries are not available as Room provides such features
- Room is designed to work with LiveData and RxJava for data observation, on the other hand SQLite does not support these features
- The SQL queries require lots of boilerplate code to convert into Java data objects whereas, In Room Database it is not required and hence lite to use
We can define our databases, tables, and operations using annotations. Room will automatically translate these annotations into SQLite instructions/queries to perform the corresponding operations into the database engine.
Components of Room DB

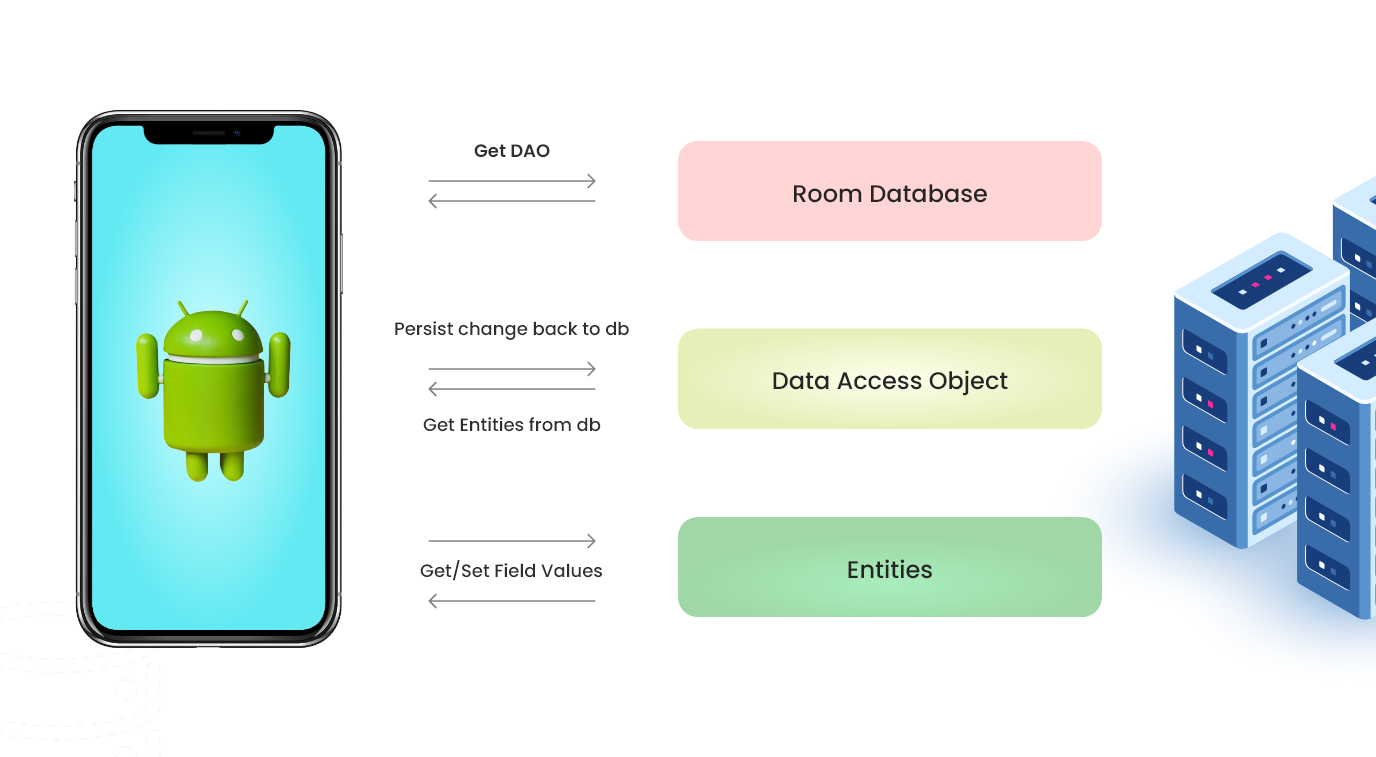
Room Database Architecture
The three main components of Room DB
- Entity — Used to define our database tables
- Database — Represents a data holder
- DAO — Which Provides an API for reading and writing data
Entity
This is a model class where we define the properties that will be used as column fields. We also need to name the table. @PrimaryKey must be present in at least one property.
Database
This is an abstract class which must extend the RoomDatabase. We must set the Entity here. Also, we need to update the version number every time we change the schema.
Dao
Data Access Object. This is the interface where we set our SQL queries. @Insert, @Query, @Update@Delete.
@Insert cannot return an int.
@Update and @Delete can return an int which represents the number of rows changed/deleted.
Implementation of Room
Add Room to your project
def room_version = “2.2.4”

implementation “androidx.room:room-runtime:$room_version”
annotationProcessor “androidx.room:room-compiler:$room_version”
Add a permission in manifest file to allow app to save data into storage
<uses-permission android:name=”android.permission.WRITE_EXTERNAL_STORAGE”/>Now in the coming sections, lets focus on using Room to create an application for maintaining employee data
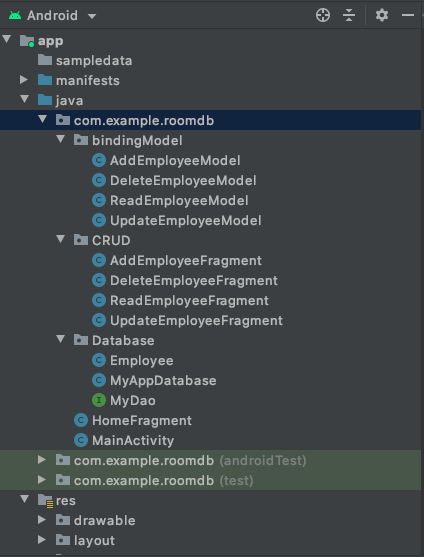
Project Structure

file component
import androidx.room.ColumnInfo;
import androidx.room.Entity;
import androidx.room.PrimaryKey;

@Entity(tableName = “employees”)
public class Employee
{
@PrimaryKey
private int id;

@ColumnInfo(name = “employee_name”)
private String name;

@ColumnInfo(name = “employee_email”)
private String email;

public int getId() {
return id;
}

public void setId(int id) {
this.id = id;
}

public String getName() {
return name;
}

public void setName(String name) {
this.name = name;
}

public String getEmail() {
return email;
}

public void setEmail(String email) {
this.email = email;
}
}

MyDao.java

import androidx.room.Dao;
import androidx.room.Delete;
import androidx.room.Insert;
import androidx.room.OnConflictStrategy;
import androidx.room.Query;
import androidx.room.Update;

import java.util.List;

@Dao
public interface MyDao
{

@Insert(onConflict = OnConflictStrategy.IGNORE)
public void addEmployee(Employee employee);

@Query(“select * from employees”)
public List<Employee> getEmployees();

@Delete
public void deleteEmployee(Employee employee);

@Update
public void updateEmployee(Employee employee);

}

Insert Data :

Employee employee = new Employee();

employee.setId(id);
employee.setName(name);
employee.setEmail(email);

HomeActivity.myAppDatabase.myDao().addEmployee(employee);

MyAppDatabase

import androidx.room.Database;
import androidx.room.RoomDatabase;

@Database(entities = {User.class},version = 1,exportSchema = true)
public abstract class MyAppDatabase extends RoomDatabase
{

public abstract MyDao myDao();
}

Insert Data

Employee employee = new Employee();

employee.setId(id);
employee.setName(name);
employee.setEmail(email);

HomeActivity.myAppDatabase.myDao().addEmployee(employee);

Get Employee Data

List<Employee> employee = HomeActivity.myAppDatabase.myDao().getEmployees();

String info = “”;

for(Employee employee: employee){

int id = employee.getId();

String name = employee.getName();

String email = employee.getEmail();

info = info +”id : “+ id+”\n”+ “name : ” + name+” \n”;
}

fragmentReadEmployeeBinding.employeeDetails.setText(info);

Delete Employee Data

Employee employee = new Employee();
employee.setId(Integer.parseInt(deleteEmployeeBinding.deleteId.getText().toString()));

HomeActivity.myAppDatabase.myDao().deleteEmployee(employee);

Update Employee Data

Employee employee = new Employee();

employee.setId(id);
employee.setName(name);
employee.setEmail(email);

HomeActivity.myAppDatabase.myDao().updateEmployee(employee);
Employee.java
By following the above steps, we would be able to successfully use Room in the Employee master application. Please note that the time taken for the same was very less when compared to using the SQLite as we did not have to write any queries. You can know more about Room Database by going through the following links:


