Introduction
We can use google mobile vision APIs that offer new face recognition APIs in android that identifies human faces in images and video more accurately and quickly with many more advantages with the release of Google Play services 7.8+.
Advantages
- Understanding faces at different orientations
- Detecting facial features
- Understanding facial expressions
Face Detection vs Facial Recognition
- Face detection is a type of computer technology that determines the locations and sizes of faces and is likely to render images randomly.
- A facial recognition system is a computer application that can automatically identify or verify a person from a digital image.
- In general face detection extracts people’s faces in images but face recognition tries to find out who they are?
Creating an App that detects faces
- Open Android Studio. Click Next after selecting File->New->New Project->Empty Activity.

- Then, enter the proper project name, choose a language such as Java, and click Finish. Once the build is successful, the app will launch.

- We can see that our activity_main layout has only one node. Delete and replace with the following
<Button
        android:layout_width=“wrap_content”
        android:layout_height=“wrap_content”
        android:text=“Process”
        android:id=“@+id/button”
        android:layout_alignParentTop=“true”
        android:layout_alignParentStart=“true” />
    <ImageView
        android:layout_width=“wrap_content”
        android:layout_height=“wrap_content”
android:id=“@+id/imgview”/>- We should edit our AndroidManifest.xml file at this point with the following line between <application>…</application>:
<meta-data
    android:name=”com.google.android.gms.vision.DEPENDENCIES”
android:value=”face” />- Add the following dependency to the build.Gradle(:app):
dependencies {
    implementation ‘com.google.android.gms:play-services-vision:20.1.0’
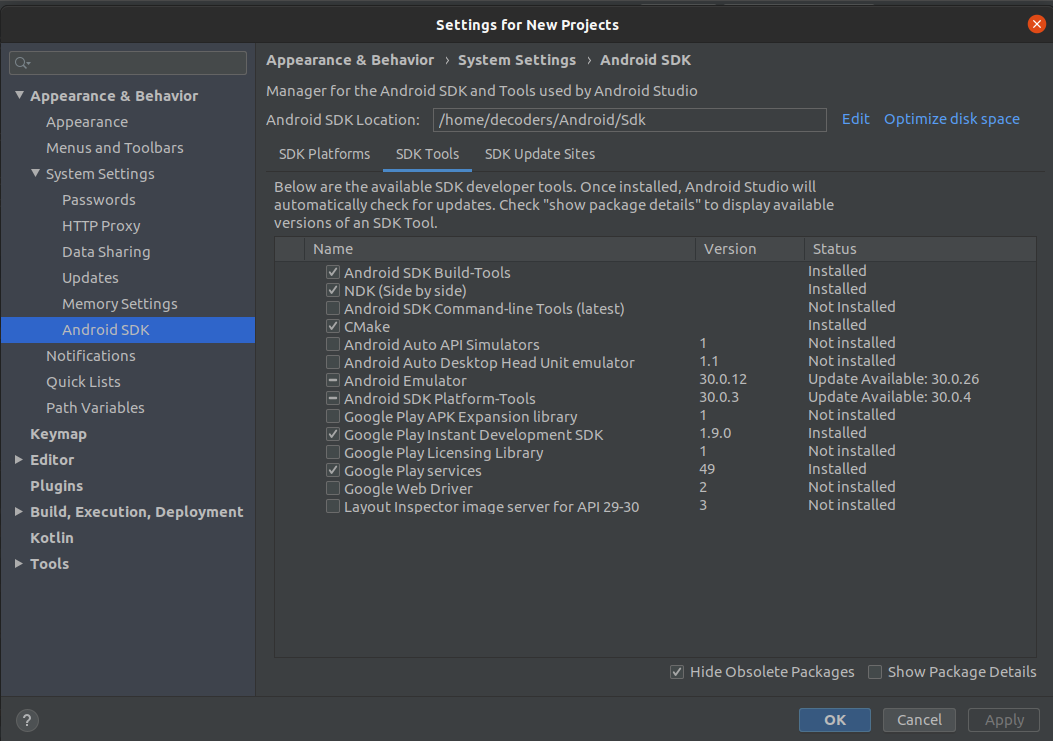
}- Download Google Play Services SDK tool: In Android Studio, Tools–>SDK Manager–>SDK Tools

- The app has been created now, we are just going to process the image that is already present on the app
Implementation
This application has a single button that loads the image, detects any faces, and draws a red rectangle around them. Let us write the code to accomplish this:
Create Button Click Listener
Add the following code to your MainActivity.java in your onCreate method.
Button btn = (Button) findViewById(R.id.button);
btn.setOnClickListener(new View.OnClickListener() {
        @Override
        public void onClick(View v) {
        }
});
This sets up the event handler (onClick) when the user presses the button. When they do this, we want the image to be loaded, processed for faces, and a red rectangle drawn over any faces it finds.
Load the Image From Resource
- Now we are going to write on the image like drawing a red rectangle over any detected faces and we are loading the image.
- We need to make sure that the bitmap is mutable.
- First we get a handle on the ImageView control for later use. The bitmap is then loaded using a BitMapFactory.
- Beware it’s accessible in the resources using R.drawable.test1. If you have used a different name for your image, make sure to replace the test1 with your name.
ImageView myImageView = (ImageView) findViewById(R.id.imgview);
BitmapFactory.Options options = new BitmapFactory.Options();
options.inMutable=true;
Bitmap myBitmap = BitmapFactory.decodeResource(
        getApplicationContext().getResources(),
        R.drawable.test1,
        options);
Create a Paint Object
- The paint object is used for drawing on the image.
- Here we have implemented a stroke width of 5 pixels and style of the stroke.
- Hence it only draws in the outline of the image.
Paint myRectPaint = new Paint();
myRectPaint.setStrokeWidth(5);
myRectPaint.setColor(Color.RED);
myRectPaint.setStyle(Paint.Style.STROKE);
Create a Canvas Object
- Here we set up a temp bitmap using the original.
- From the temp bitmap we can create a new canvas and draw the bitmap on it.
Bitmap tempBitmap = Bitmap.createBitmap(myBitmap.getWidth(), myBitmap.getHeight(), Bitmap.Config.RGB_565);
Canvas tempCanvas = new Canvas(tempBitmap);
tempCanvas.drawBitmap(myBitmap, 0, 0, null);
Create the Face Detector
- Here we create a new FaceDetector object using its builder.
- We added the dependency to AndroidManifest.xml so that the libraries would be available during implementation.
- It’s possible that, the first time our face detector runs, google play services won’t be ready to process faces yet.So we need to check if our detector is operational before we implement it.
FaceDetector faceDetector = new FaceDetector.Builder(getApplicationContext()).setTrackingEnabled(false)
.build();
if(!faceDetector.isOperational()){
  new AlertDialog.Builder(v.getContext()).setMessage(“Could not set up the face detector!”).show();
  return;
}- Here the app is detecting a face on a still frame, hence no tracking is necessary. If we are detecting faces in video or on a live preview from camera, we should set trackingEnabled on the faceDetector to ‘true’.
Detect the Faces
- Now to detect the faces create a frame using the bitmap.
- Then call the detect method on the face detector, using the frame, to get a sparse array of face objects.
Frame frame = new Frame.Builder().setBitmap(myBitmap).build();
SparseArray<Face> faces = faceDetector.detect(frame);
Draw Rectangles on the Faces
- Now we have a sparse array of faces.
- We can iterate through this array to obtain the coordinates of the face’s bounding rectangle.
- The API returns the top left corner’s X and Y coordinates, as well as the width and height.
- The Rectangle requires X, Y of the top left and bottom right corners.
- So we must compute the bottom right using the top left, width, and height.
for(int i=0; i<faces.size(); i++) {
  Face thisFace = faces.valueAt(i);
  float x1 = thisFace.getPosition().x;
  float y1 = thisFace.getPosition().y;
  float x2 = x1 + thisFace.getWidth();
  float y2 = y1 + thisFace.getHeight();
  tempCanvas.drawRoundRect(new RectF(x1, y1, x2, y2), 2, 2, myRectPaint);
}
myImageView.setImageDrawable(new BitmapDrawable(getResources(),tempBitmap));
Conclusion
Now all you have to do is run the app. So, for example, if you use the face2.jpg from earlier, you’ll see that the man face is detected.


